
Kubernetes
Kubernetes
1. 环境准备
1.1 准备 Kubernetes 集群
确保拥有一个可用的 Kubernetes 集群(建议最低版本:Kubernetes 1.24),作为部署 IoTDB 集群的基础。
Kubernetes 版本要求:建议版本为 Kubernetes 1.24及以上
IoTDB版本要求:不能低于v1.3.3
2. 创建命名空间
2.1 创建命名空间
注意:在执行命名空间创建操作之前,需验证所指定的命名空间名称在 Kubernetes 集群中尚未被使用。如果命名空间已存在,创建命令将无法执行,可能导致部署过程中的错误。
kubectl create ns iotdb-ns2.2 查看命名空间
kubectl get ns3. 创建 PersistentVolume (PV)
3.1 创建 PV 配置文件
PV用于持久化存储IoTDB的ConfigNode 和 DataNode的数据,有几个节点就要创建几个PV。
注:1个ConfigNode和1个DataNode 算2个节点,需要2个PV。
以 3ConfigNode、3DataNode 为例:
- 创建
pv.yaml文件,并复制六份,分别重命名为pv01.yaml~pv06.yaml。
#可新建个文件夹放yaml文件
#创建 pv.yaml 文件语句
touch pv.yaml- 修改每个文件中的
name和path以确保一致性。
pv.yaml 示例:
# pv.yaml
apiVersion: v1
kind: PersistentVolume
metadata:
  name: iotdb-pv-01
spec:
  capacity:
    storage: 10Gi # 存储容量
  accessModes: # 访问模式
    - ReadWriteOnce
  persistentVolumeReclaimPolicy: Retain # 回收策略
  # 存储类名称,如果使用本地静态存储storageClassName 不用配置,如果使用动态存储必需设置此项
  storageClassName: local-storage
  # 根据你的存储类型添加相应的配置
  hostPath: # 如果是使用本地路径
    path: /data/k8s-data/iotdb-pv-01
    type: DirectoryOrCreate  # 这行不配置就要手动创建文件夹
3.2 应用 PV 配置
kubectl apply -f pv01.yaml
kubectl apply -f pv-02.yaml
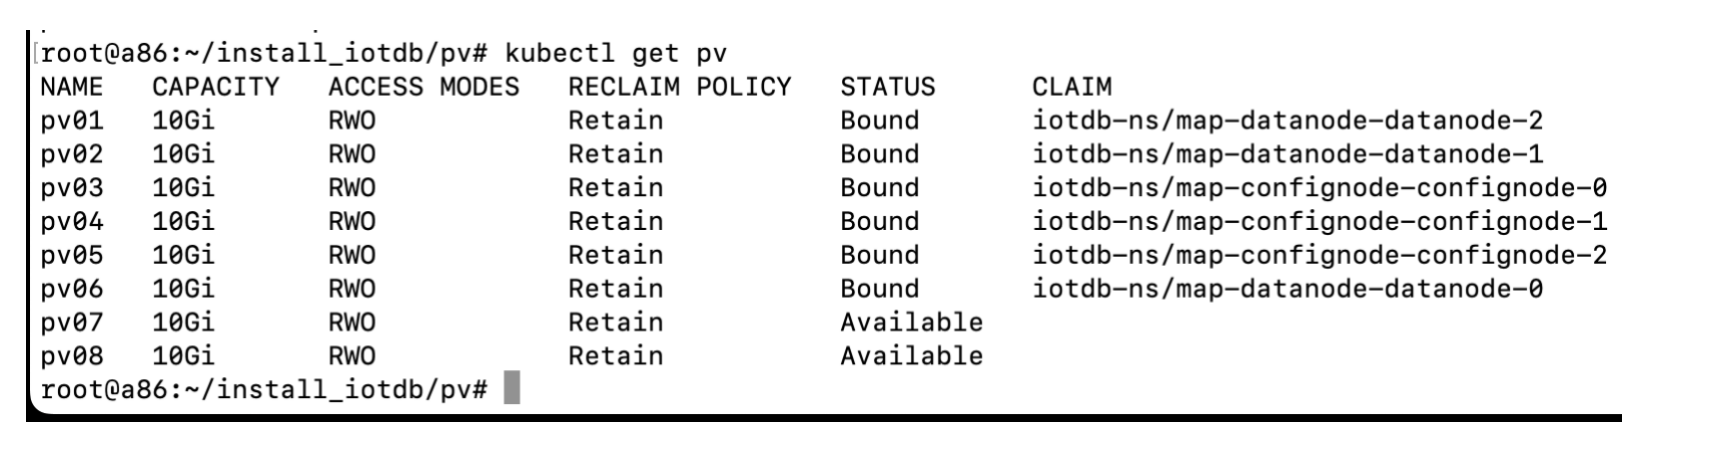
...3.3 查看 PV
kubectl get pv
3.4 手动创建文件夹
如果yaml里的hostPath-type未配置,需要手动创建对应的文件夹
在所有 Kubernetes 节点上创建对应的文件夹:
mkdir -p /data/k8s-data/iotdb-pv-01
mkdir -p /data/k8s-data/iotdb-pv-02
...
4. 安装 Helm
安装Helm步骤请参考Helm官网
5. 配置IoTDB的Helm Chart
5.1 克隆 IoTDB Kubernetes 部署代码
请联系天谋工作人员获取IoTDB的Helm Chart
5.2 修改 YAML 文件
确保使用的是支持的版本 >=1.3.3.2
values.yaml 示例:
nameOverride: "iotdb"
fullnameOverride: "iotdb"   #软件安装后的名称

image:
  repository: nexus.infra.timecho.com:8143/timecho/iotdb-enterprise
  pullPolicy: IfNotPresent
  tag: 1.3.3.2-standalone    #软件所用的仓库和版本

storage:
# 存储类名称,如果使用本地静态存储storageClassName 不用配置,如果使用动态存储必需设置此项
  className: local-storage

datanode:
  name: datanode
  nodeCount: 3        #datanode的节点数量
  enableRestService: true
  storageCapacity: 10Gi       #datanode的可用空间大小
  resources:
    requests:
      memory: 2Gi    #datanode的内存初始化大小
      cpu: 1000m     #datanode的CPU初始化大小
    limits:
      memory: 4Gi    #datanode的最大内存大小
      cpu: 1000m     #datanode的最大CPU大小

confignode:
  name: confignode
  nodeCount: 3      #confignode的节点数量
  storageCapacity: 10Gi      #confignode的可用空间大小
  resources:
    requests:
      memory: 512Mi    #confignode的内存初始化大小
      cpu: 1000m      #confignode的CPU初始化大小
    limits:
      memory: 1024Mi   #confignode的最大内存大小
      cpu: 2000m     #confignode的最大CPU大小
  configNodeConsensusProtocolClass: org.apache.iotdb.consensus.ratis.RatisConsensus
  schemaReplicationFactor: 3
  schemaRegionConsensusProtocolClass: org.apache.iotdb.consensus.ratis.RatisConsensus
  dataReplicationFactor: 2
  dataRegionConsensusProtocolClass: org.apache.iotdb.consensus.iot.IoTConsensus
6. 配置私库信息或预先使用ctr拉取镜像
在k8s上配置私有仓库的信息,为下一步helm install的前置步骤。
方案一即在 helm install 时拉取可用的iotdb镜像,方案二则是提前将可用的iotdb镜像导入到containerd里。
6.1 【方案一】从私有仓库拉取镜像
6.1.1 创建secret 使k8s可访问iotdb-helm的私有仓库
下文中“xxxxxx”表示IoTDB私有仓库的账号、密码、邮箱。
# 注意 单引号
kubectl create secret docker-registry timecho-nexus \
  --docker-server='nexus.infra.timecho.com:8143' \
  --docker-username='xxxxxx' \
  --docker-password='xxxxxx' \
  --docker-email='xxxxxx' \
  -n iotdb-ns

# 查看secret
kubectl get secret timecho-nexus -n iotdb-ns
# 查看并输出为yaml
kubectl get secret timecho-nexus --output=yaml -n iotdb-ns
# 查看并解密
kubectl get secret timecho-nexus --output="jsonpath={.data.\.dockerconfigjson}" -n iotdb-ns | base64 --decode
6.1.2 将secret作为一个patch加载到命名空间iotdb-ns
# 添加一个patch,使该命名空间增加登陆nexus的登陆信息
kubectl patch serviceaccount default -n iotdb-ns -p '{"imagePullSecrets": [{"name": "timecho-nexus"}]}'

# 查看命名空间的该条信息
kubectl get serviceaccounts -n iotdb-ns -o yaml
6.2 【方案二】导入镜像
该步骤用于客户无法连接私库的场景,需要联系公司实施同事辅助准备。
6.2.1 拉取并导出镜像:
ctr images pull --user xxxxxxxx nexus.infra.timecho.com:8143/timecho/iotdb-enterprise:1.3.3.2-standalone6.2.2 查看并导出镜像:
# 查看
ctr images ls

# 导出
ctr images export iotdb-enterprise:1.3.3.2-standalone.tar nexus.infra.timecho.com:8143/timecho/iotdb-enterprise:1.3.3.2-standalone
6.2.3 导入到k8s的namespace下:
注意,k8s.io为示例环境中k8s的ctr的命名空间,导入到其他命名空间是不行的
# 导入到k8s的namespace下
ctr -n k8s.io images import iotdb-enterprise:1.3.3.2-standalone.tar
6.2.4 查看镜像
ctr --namespace k8s.io images list | grep 1.3.3.27. 安装 IoTDB
7.1 安装 IoTDB
# 进入文件夹
cd iotdb-cluster-k8s/helm

# 安装iotdb
helm install iotdb ./ -n iotdb-ns
7.2 查看 Helm 安装列表
# helm list
helm list -n iotdb-ns
7.3 查看 Pods
# 查看 iotdb的pods
kubectl get pods -n iotdb-ns -o wide
执行命令后,输出了带有confignode和datanode标识的各3个Pods,,总共6个Pods,即表明安装成功;需要注意的是,并非所有Pods都处于Running状态,未激活的datanode可能会持续重启,但在激活后将恢复正常。
7.4 发现故障的排除方式
# 查看k8s的创建log
kubectl get events -n iotdb-ns
watch kubectl get events -n iotdb-ns

# 获取详细信息
kubectl describe pod confignode-0 -n iotdb-ns
kubectl describe pod datanode-0 -n iotdb-ns

# 查看confignode日志
kubectl logs -n iotdb-ns confignode-0 -f
8. 激活 IoTDB
8.1 方案1:直接在 Pod 中激活(最快捷)
kubectl exec -it -n iotdb-ns confignode-0 -- /iotdb/sbin/start-activate.sh
kubectl exec -it -n iotdb-ns confignode-1 -- /iotdb/sbin/start-activate.sh
kubectl exec -it -n iotdb-ns confignode-2 -- /iotdb/sbin/start-activate.sh
# 拿到机器码后进行激活
8.2 方案2:进入confignode的容器中激活
kubectl exec -it -n iotdb-ns confignode-0 -- /bin/bash
cd /iotdb/sbin
/bin/bash start-activate.sh
# 拿到机器码后进行激活
# 退出容器
8.3 方案3:手动激活
- 查看 ConfigNode 详细信息,确定所在节点:
kubectl describe pod confignode-0 -n iotdb-ns | grep -e "Node:" -e "Path:"

# 结果示例:
# Node:          a87/172.20.31.87
# Path: /data/k8s-data/env/confignode/.env- 查看 PVC 并找到 ConfigNode 对应的 Volume,确定所在路径:
kubectl get pvc -n iotdb-ns | grep "confignode-0"

# 结果示例:
# map-confignode-confignode-0   Bound    iotdb-pv-04   10Gi       RWO            local-storage   <unset>                 8h

# 如果要查看多个confignode,使用如下:
for i in {0..2}; do echo confignode-$i;kubectl describe pod confignode-${i} -n iotdb-ns | grep -e "Node:" -e "Path:"; echo "----"; done- 查看对应 Volume 的详细信息,确定物理目录的位置:
kubectl describe pv iotdb-pv-04 | grep "Path:"

# 结果示例:
# Path: /data/k8s-data/iotdb-pv-04- 从对应节点的对应目录下找到 system-info 文件,使用该 system-info 作为机器码生成激活码,并在同级目录新建文件 license,将激活码写入到该文件。
9. 验证 IoTDB
9.1 查看命名空间内的 Pods 状态
查看iotdb-ns命名空间内的IP、状态等信息,确定全部运行正常
kubectl get pods -n iotdb-ns -o wide

# 结果示例:
# NAME           READY   STATUS    RESTARTS         AGE   IP             NODE   NOMINATED NODE   READINESS GATES
# confignode-0   1/1     Running   0                75m   10.20.187.14   a87    <none>           <none>
# confignode-1   1/1     Running   0                75m   10.20.191.75   a88    <none>           <none>
# confignode-2   1/1     Running   0                75m   10.20.187.16   a87    <none>           <none>
# datanode-0     1/1     Running   10 (5m54s ago)   75m   10.20.191.74   a88    <none>           <none>
# datanode-1     1/1     Running   10 (5m42s ago)   75m   10.20.187.15   a87    <none>           <none>
# datanode-2     1/1     Running   10 (5m55s ago)   75m   10.20.191.76   a88    <none>           <none>
9.2 查看命名空间内的端口映射情况
kubectl get svc -n iotdb-ns

# 结果示例:
# NAME             TYPE           CLUSTER-IP      EXTERNAL-IP   PORT(S)          AGE
# confignode-svc   NodePort       10.10.226.151   <none>        80:31026/TCP     7d8h
# datanode-svc     NodePort       10.10.194.225   <none>        6667:31563/TCP   7d8h
# jdbc-balancer    LoadBalancer   10.10.191.209   <pending>     6667:31895/TCP   7d8h
9.3 在任意服务器启动 CLI 脚本验证 IoTDB 集群状态
端口即jdbc-balancer的端口,服务器为k8s任意节点的IP
start-cli.sh -h 172.20.31.86 -p 31895
start-cli.sh -h 172.20.31.87 -p 31895
start-cli.sh -h 172.20.31.88 -p 31895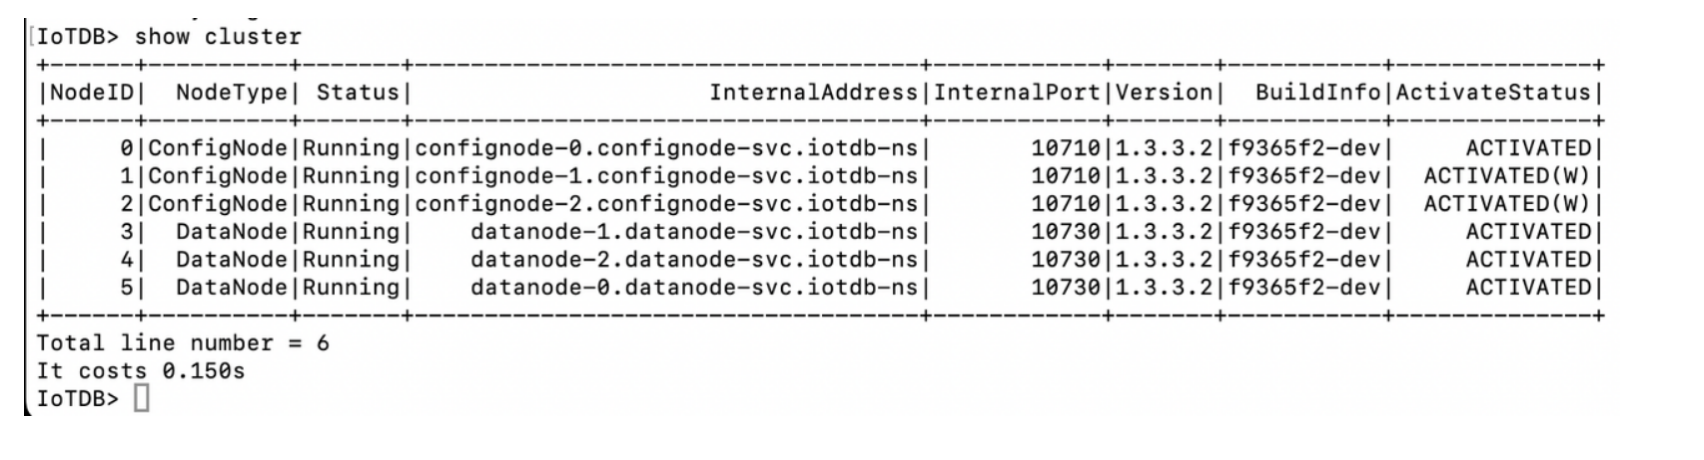
10. 扩容
10.1 新增pv
新增pv,必须有可用的pv才可以扩容。
注意:DataNode重启后无法加入集群
原因:配置了静态存储的 hostPath 模式,并通过脚本修改了 iotdb-system.properties 文件,将 dn_data_dirs 设为 /iotdb6/iotdb_data,/iotdb7/iotdb_data,但未将默认存储路径 /iotdb/data 进行外挂,导致重启时数据丢失。
解决方案:是将 /iotdb/data 目录也进行外挂操作,且 ConfigNode 和 DataNode 均需如此设置,以确保数据完整性和集群稳定性。
10.2 扩容confignode
示例:3 confignode 扩容为 4 confignode
修改iotdb-cluster-k8s/helm的values.yaml文件,将confignode的3改成4
helm upgrade iotdb . -n iotdb-ns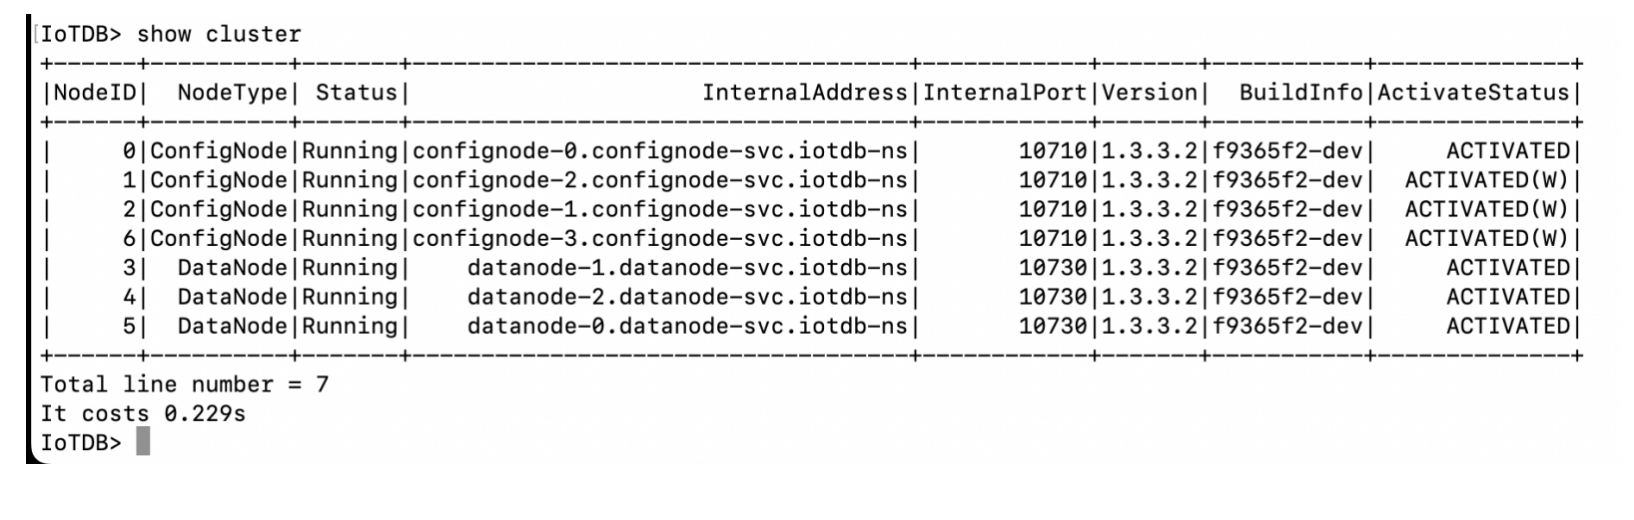
10.3 扩容datanode
示例:3 datanode 扩容为 4 datanode
修改iotdb-cluster-k8s/helm的values.yaml文件,将datanode的3改成4
helm upgrade iotdb . -n iotdb-ns10.4 验证IoTDB状态
kubectl get pods -n iotdb-ns -o wide

# NAME           READY   STATUS    RESTARTS         AGE   IP             NODE   NOMINATED NODE   READINESS GATES
# confignode-0   1/1     Running   0                75m   10.20.187.14   a87    <none>           <none>
# confignode-1   1/1     Running   0                75m   10.20.191.75   a88    <none>           <none>
# confignode-2   1/1     Running   0                75m   10.20.187.16   a87    <none>           <none>
# datanode-0     1/1     Running   10 (5m54s ago)   75m   10.20.191.74   a88    <none>           <none>
# datanode-1     1/1     Running   10 (5m42s ago)   75m   10.20.187.15   a87    <none>           <none>
# datanode-2     1/1     Running   10 (5m55s ago)   75m   10.20.191.76   a88    <none>           <none>
# datanode-3     1/1     Running   10 (5m55s ago)   75m   10.20.191.76   a88    <none>           <none>